
The Catherine’s wheel stitch uses rows of large alternating circles to create a unique and feminine pattern
I’m very excited to share a LOT of information with you about the trendy Catherine’s Wheel Stitch.
This stitch pattern is such a unique and pretty crochet technique.

Below, you can find written and video instructions for the classic Catherine’s wheel stitch. You can see the effect that you get with this stitch with one-color, two-color, and multi-colored patterns.
Plus, I’ve even included instructions for a variation of the Catherine’s Wheel Stitch, that you can use whenever a smaller pattern repeat works better for what you are trying to achieve.
Now, let’s get started with crocheting this beautiful stitch!
- Written Instructions for Catherine’s Wheel
- Helpful Information
- Catherine’s Wheel Stitch Video Tutorial
- Catherine’s Wheel Stitch Variation: Fewer Stitches Used
- Crochet Catherine’s Wheel Stitch Variation Video Tutorial
- Color Patterns Using Catherine’s Wheel
- Catherine’s Wheel Project Ideas
- Final Thoughts
- You might also like:
Written Instructions for Catherine’s Wheel
Here are some simple written directions for crocheting the Catherine’s Wheel stitch. Depending on how you prefer to follow directions and your level of experience, this may be all you need.
Below, you can find these directions broken down row-by-row with pictures (and of course see the video tutorial as well).
Abbreviations used:
- Ch-chain
- Dc-double crochet
- Sc-single crochet
- st/sts-stitch/stitches
- Ch-space- this refers to a space created by multiple chain stitches that were already worked.
To the purpose of learning, these instructions are for a piece of Catherine’s wheel stitch that is a couple of repeats wide. You can start this stitch with a chain that is any multiple of 10sts + 4.
This provides ten stitches for the repeat, three stitches to make the pattern symmetrical(which is my preference) and one stitch to use as a first turning chain.
Directions: Classic Catherine’s Wheel Stitch
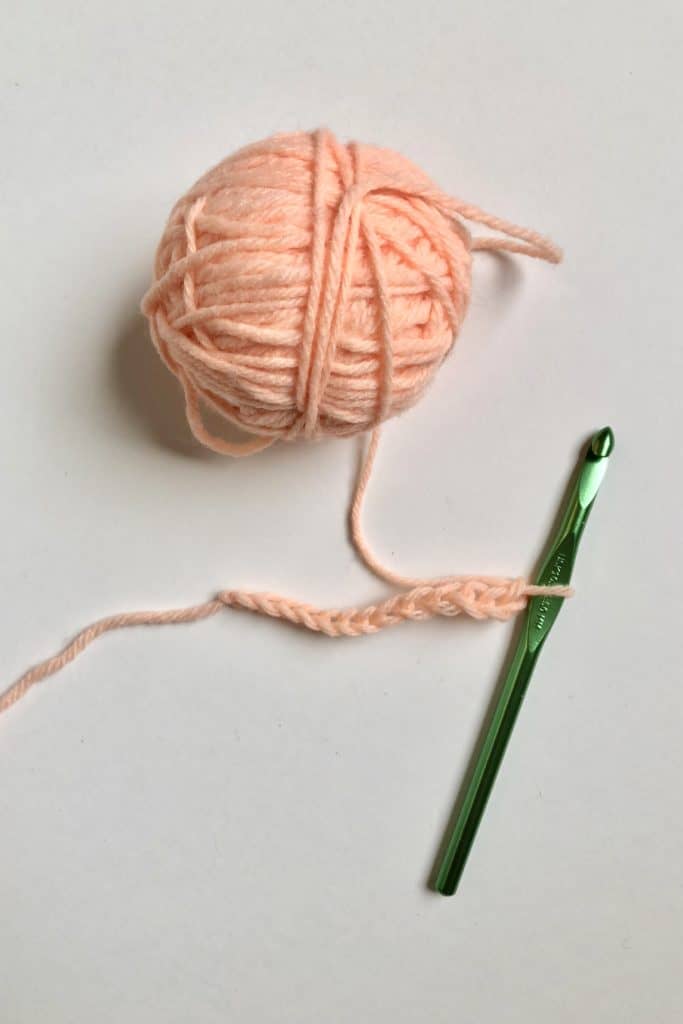
Ch24
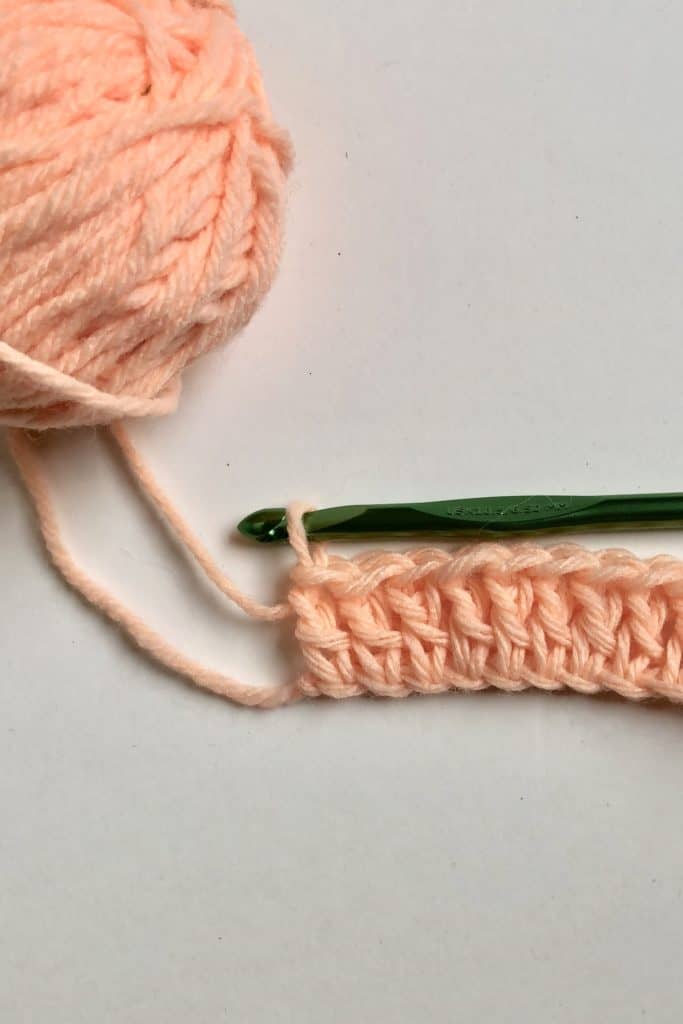
Row 1: Skip a ch and sc3. *skip 3ch, dc7 in the next st, skip 3ch and sc3* Repeat to the end of the row.
Row 2: ch3(counts as a stitch) dc4 tog across the next 4sts. *ch3, sc3, ch3 and dc7tog across the next 7sts* Repeat until you get to the last shell from the previous row. ch3, sc3, ch3 and dc5tog across the last 5sts.
Row 3: ch3(counts as a stitch) dc4 at the base of your ch3. *Skip the ch-space and sc3 into the 3sc stitches from the previous row. Skip the ch-space and dc7 in the top of your dc7tog from the previous row.* Repeat until you get to the last sc stitches from your previous row. Skip the ch-space, sc3, skip the ch-space and dc5 in the top of your partial pinwheel from the previous row.
Row 4: ch1, *sc3. Ch3 and dc7tog across the next seven sts. ch3* Repeat to the end of the row. Sc3(your last sc stitch will be in the top of a turning chain).
Row 5: ch1, *sc3. Skip the ch-space and dc7 in the top of your dc7tog from the previous row. Skip the ch-space.* Repeat to your last 3sts, then sc3.
Repeat rows 2-5.
Helpful Information
Stitches Used/Special Stitches Used:
The main stitches used in the Catherine’s Wheel Stitch are easy enough: double crochet and single crochet. If you need to, you can always check out my tutorials for the single crochet and double crochet stitches to review.
What seems a bit more complicated at first glance are the shells and stitches worked together. To make the “pinwheels” in this pattern, large shells of double crochet need to line up with sets of double crochet stitches that are all worked together in the row right under them.
Shells are fairly straightforward. Several tall stitches are worked into the same stitch so that they fan out to create a shell shape. In this case, working seven double crochet stitches together creates a large shell, and skipping stitches before and after the shell give it the space it needs to spread out.
The other side of creating the “wheels” in the Catherine’s wheel stitch come from working seven double crochet stitches together (7dctog).
We do this by completing each of the double crochet stitches halfway, and then doing the final yarn over for all of them at once.

Skill Level
The Catherine’s Wheel Stitch is certainly more involved than just working a stitch like single or double crochet on it’s own. However, that doesn’t mean that it feels harder.
In fact, while I would label this as an intermediate stitch, I personally think it is easier to crochet once you get familiar with the repeat.
What makes it easier to continue crocheting this stitch is the pattern repeat. As soon as you get a few rows in working Catherine’s Wheel, it becomes very clear that the stitches in every row have to line up. If they don’t, you won’t get the wheels!
This means that as soon as you make a mistake in this pattern, you will know it. Your groups of double crochet stitches that are worked in shells and groups of dc7tog simply won’t line up. The fact that this is such an “unforgiving” pattern actually works in your favor.
Suggested Yarn/Materials
While this stitch will work in virtually any weight of yarn, some textures will make it harder to see. To really show off this pattern, I recommend sticking with smoother yarns that have at least some definition and aren’t too fuzzy or fussy.
Multicolored yarns and even yarns with a bit of a halo (light fuzziness) will probably still work fine depending on the yarn.
One thing to consider is your choice of hook. Aside from using an appropriate hook for the weight of yarn that you are using, your hook shape can help to make this stitch easier. If you have a hook with a rubberized or thicker handle, pay attention to how that affects working with multiple loops on your hook at once.
For example, my absolute favorite hooks are the clover amour hooks. These have a wonderful ergonomic handle and are absolutely perfect for most things.
However, the clover amours actually don’t have very much space between the hook head and the beginning of the handle. I find that when working with a lot of loops at once, I end up with yarn rubbing against the handle.
In my case, this usually doesn’t cause a problem and I just work with it. But, if you find that something similar happens to you, it may work better to use a simple aluminum hook or another straight option when crocheting this stitch.
Catherine’s Wheel Stitch Video Tutorial
Here is the video where you can watch me demonstrate the Catherine’s Wheel stitch step by step, using the exact same stitch count as the written directions:
Catherine’s Wheel Stitch Variation: Fewer Stitches Used
In case you ever want to use this pattern in a project where a smaller repeat would work better, here is another option you can try. As a “condensed” variation of the Catherine’s wheel stitch, the pattern isn’t quite as pronounced.
For this version, your starting chain should be a multiple of 6+2(six for the repeat, one to make it symmetrical, and one for the first turning chain.) If you want a similar effect with a shorter repeat of stitches, feel free to give this a try. I’ve included written directions and, again, a video that goes right along with them:
Directions: Catherine’s Wheel Smaller Variation
Ch 14
Row 1: Skip a ch and sc1. *skip 2ch, dc5 in the next st, skip 2ch and sc1* Repeat to the end of the row.
Row 2: ch3(counts as a stitch) dc2tog across the next 2sts. *ch3, sc, ch3 and dc5tog across the next 5sts* Repeat until you get to the last shell from the previous row. ch3, sc3, ch3 and dc3tog across the last 3sts.
Row 3: ch3(counts as a stitch) dc2 at the base of your ch3. *Skip the ch-space and sc into the sc stitch from the previous row. Skip the ch-space and dc5 in the top of your dc5tog from the previous row.* Repeat until you get to the last sc stitches from your previous row. Skip the ch-space, sc, skip the ch-space and dc3 in the top of your partial pinwheel from the previous row.
Row 4: ch1, *sc. Ch3 and dc5tog across the next five sts. Ch3 and* Repeat to the end of the row and end with a sc in the top of a turning chain).
Row 5: ch1, *sc. Skip the ch-space and dc5 in the top of your dc5tog from the previous row. Skip the ch-space.* Repeat to your last stitch, then sc.
Repeat rows 2-5
Crochet Catherine’s Wheel Stitch Variation Video Tutorial
Color Patterns Using Catherine’s Wheel
So far, I have demonstrated how to crochet the Catherine’s Wheel Stitch using what we call the “Two color” version. This way seems very well-suited for showing off this stitch because it really displays the different sets of “pinwheels” that get created as you crochet. Here, you can see this pattern in both the classic and smaller versions:

Here are a couple of other examples of color:
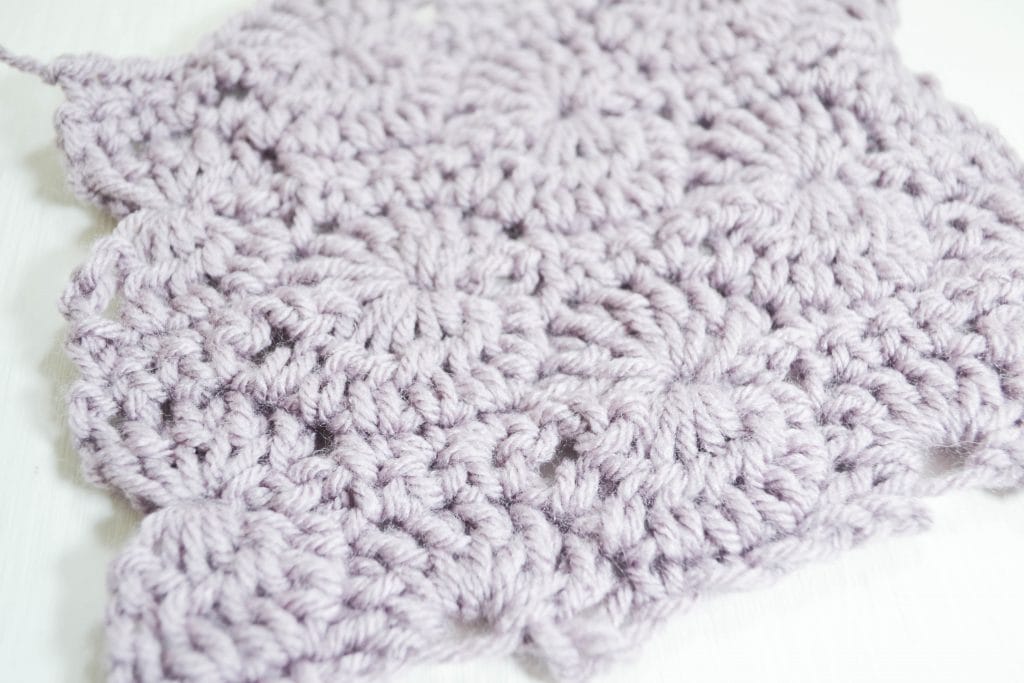
Monochrome (single color) Catherine’s Wheel
When done in a single color, the Catherine’s wheel stitch has a very classic look. It seems a bit lacy and feminine, but is still moderately warm for whatever yarn you are using(meaning the holes aren’t really big).
Multicolored Catherine’s Wheel Stitch (with each row a different)
This looks exactly like an optical illusion! With every single row a different color, crocheting the Catherine’s Wheel stitch looks like waves that are all opposite of each other. Instead of really showing how the clusters and shells of this stitch make wheels when combined in multiple rows, using different colors every single time breaks the pattern up visually. The result is something that looks a little bit crazy and disrupted, and has a totally different look. Personally, I would love to use this idea in a multicolored project!

Catherine’s Wheel Project Ideas
The Catherine’s Wheel stitch would be beautiful in many different wearable and household items. Sweaters, accessories, bags, and baby items (especially baby blankets) are just a few ideas.
You can check out my adorable fingerless gloves that uses this stitch.
Final Thoughts
Hopefully this tutorial has been helpful to you in learning the Catherine’s Wheel Stitch! Now that you’ve gotten familiar with it, you have a beautiful and interesting option for tons of future projects.
Before you go, be sure to sign up for updates if you would like ongoing “first looks” at new projects and tutorials. I enjoy sharing tips, and special offers, and hearing back from readers too!
Keep the Crafting Delightful!
Amelia
Learning how to Crochet the Catherine’s Wheel stitch gives you an interesting pattern for all kinds of projects
You might also like:
Don’t Forget to Pin This for Later!

Pingback: Cozy Cathy Gloves-Free Crochet Fingerless Gloves Pattern ~ Amelia Makes