
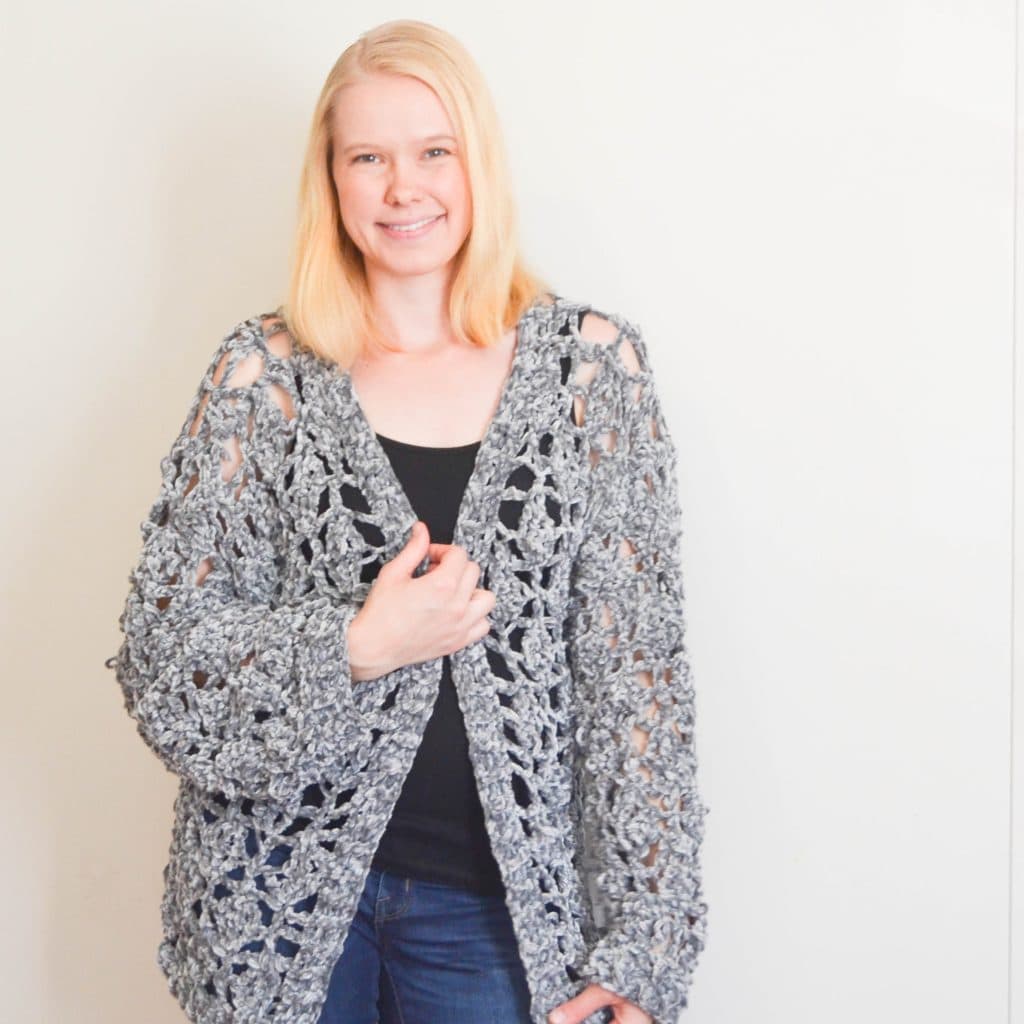
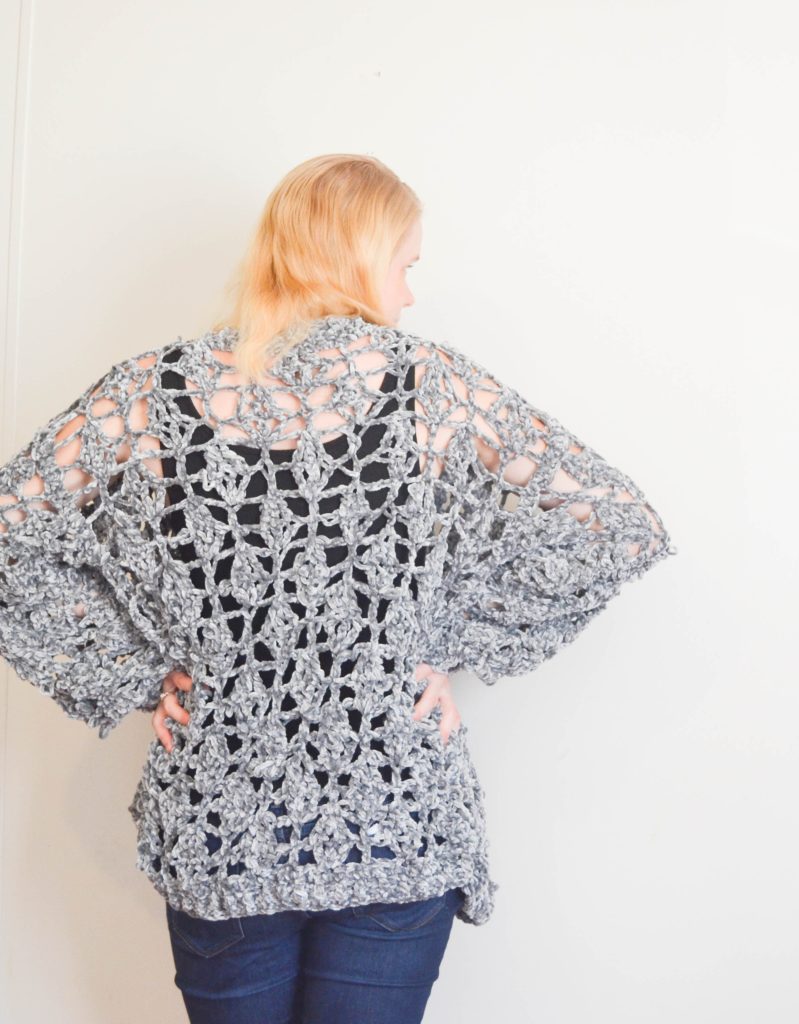
This kimono crochet pattern combines super-plush texture with a lacy openwork design.
The Velvet Diamonds Kimono has truly been a labor of love. It’s super soft and a beautiful delicate sweater made in Bernat Velvet. So it’s like wrapping yourself in baby-soft luxury without a lot of weight.
The free pattern below is in extra small and the PDF pattern (which you can purchase below) comes in all sizes (xs, s, m, l, xl) and with two sleeve options that are long or short.
(Note: This post contains affiliate links, meaning that if you make a purchase it may benefit me at no extra cost to you. You can read all of my affiliate disclosures and other disclaimers on the disclaimers page. )
About This Project
First of all, the fact that this design is made with velvet yarn brings its own considerations. Velvet yarn is incredibly soft, but it can also be quite slippery to work with. It may take a little extra practice to get consistent stitches if you have never crocheted with a yarn like this before. With all that said, the end result is worth it!
Another thing to consider is the care of velvet yarn. It’s very clearly labeled that this beautiful stuff does need to be hand washed. No throwing it in with your jeans and kids’ clothes! In fact, here’s a picture of what happened to a swatch of velvet crochet that I put through just one cycle myself, just to see what would happen:
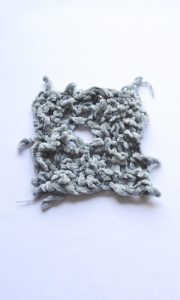
While I sure hope that the handwashing requirement won’t keep you from trying this project, I do want to bring it up to save you from the loss of your hard work. I’ve seen bad reviews written for this yarn based solely on how it comes apart in the wash. This is one instance where it really does pay off to read the label…and follow it.
Important note: The free pattern below is in extra small. If you would like to get the pattern in all sizes, you can purchase the ad-free PDF pattern below!
Prefer the PDF Pattern in All Sizes?
Grab the ad-free, printable PDF pattern.
You can view it on your computer, phone or tablet or download and print it at home.
Sizing
Currently, this kimono is available in four sizes. Here are some details so you can see which option is best for you:
- Size extra small, which fits hips of 36” and has a shorter arm and body length
- Size small/medium, which fits hips of 38-40” (this is the size I’m wearing). Just in case you are wondering, the small and medium sizes are grouped together simply due to the fact that this kimono is fairly loose. The differences in measurements between small and medium sizes wasn’t enough to justify two totally separate sets of instructions.
- Size Large, which fits 42” hips
- Size Extra Large, which fits 46-48” hips. This size is a bit longer as well.
While the small/medium size is available for free, you can access the full version of this pattern by upgrading to my Crochet Maker’s Vault.
Skill Level
Given the delicacy of the yarn, I would consider this project to be for advanced-beginners to intermediate crocheters.
Materials Needed
To make the Diamonds Crochet Kimono, you’ll need just a few things:
- 2-4 skeins of Bernat Velvet Yarn. The kimono pictured has been done in the “Smoky Green” color. Link:
- K/10.5mm Hook
- Scissors
While this pattern could be made with other bulky yarns, it has really been designed to show off the beauty of velvet yarn.
With that being said, the amount of yarn you need can vary widely (anywhere from 375-830 yards!) based on the size you want to make and the sleeve option you choose.
Obviously, shorter kimono-style sleeves will use significantly less yarn than the long sleeves, which are almost like those on a slouchy cardigan. The longer sleeves are also made with a cuff that is wider than the short sleeves, to provide more structure.
Gauge
The gauge for this project is 8sts and 5 rows of dc per 4″ square.
Abbreviation Used
- Ch-chain
- Dc-double crochet
- Rep-repeat
sists-stitch stilches
- Sc-single crochet
- FPdc- front post double crochet
- BPdc- back post double crochet
Pattern in Extra Small Size
Stitches Used
The “diamond” repeat in this kimono uses a few different stitches. The main “diamonds” are done in triple crochet with chain stitches in-between them. The tops of the diamonds get formed by 3 triple crochet stitches worked together.
Double crochet stitches are also used in the repeat, and single crochet is used for shaping the kimono a little bit, and for adding edging and seaming up these lacy panels.
And finally, the ribbing for the cuffs and edging on this project are made with Front-Post and Back-Post Stitches.
Considering the type of yarn we are dealing with, the lacy design, and the moderate amount of shaping that is involved, I would call this a solid intermediate project.
Pattern Direction
Back Panel
Ch 41 sts
Row I: skip a st and sc in every other stitch. This will give you a total of 40 stitches. Ch3
Row 2: *ch1, skip 3 sts and (tr, ch1) 3x into the next stitch. Skip 3 sts, dc. *Repeat this 4 more times across the row Chs and turn
Row 3: *ch 3 (skip a st and start a tr) 3x. Finish all 3 tr stitches together. Ch3, skip a st and dc.”Repeat this 4 more times across the row. Ch3 and turn.
Row 4: ch3, *skip 3 sts and dc (work into the top of your 3 tr that are worked together from row 3). Ch1, skip 3 sts and (tr, ch1) 3x into the next stitch.* Repeat 3 more times, then: skip 3 sts and dc. Ch3, Skip 3 sts and dc in the end of the row. Ch3 and turn.
Row 5:*ch3, skip 3 sts and dc. Ch 3 (skip a st and start a tr)3x. Finish all 3 tr stitches together* Repeat 3 more times, then: Ch3, skip a stitch and dc. Ch3, Skip 3 sts and dc into the end of the row. Ch3 and turn. (At this point, your work should be about 5″ tall).
Repeat rows 2-5 3 more times.
Neck Shaping
To shape the neck, continue working one more row, but replace some middle stitches with sc. After your Chs and turn from the previous row:
Row I: *ch1, skip 3 sts and (tr, ch1) 3x into the next stitch. Skip 3 sts, dc. *Repeat one more time. Sc for the next 8 sts, working 3 into each ch-space, and one into each dc top and each place where 3tr stitches are gathered together. *ch1, skip 3 sts and (tr, ch1) 3x into the next stitch. Skip 3 sts. dc.
* Repeat one more time
Front Panel (Make 2)
Ch 25
Row I: skip a st and sc other stitch, for a total of 24 sts. Ch3 and turn.
Row 2: *ch1, skip 3 sts and (tr, chI)3x into the next stitch. Skip 3 sts, dc. *Repeat this 2 more times. Chs and turn.
Row 3: “ch 3 (skip a st and start a tr)3x. Finish all 3 tr stitches together. Ch3, skip a st and dc. *Repeat this 2 more times. Ch3 and turn
Row 4: ch3, *skip 3 sts and dc(work into the top of your 3 tr that are worked together from row 3).
ChI, skip 3 sts and (tr, chI)3x into the next stitch. * Repeat 1 times, then: skip 3 sts and dc.
Ch3, Skip 3 sts and dc in the end of the row. Ch3 and turn.
Row 5:*ch3, skip 3 sts and dc. Ch 3 (skip a st and start a tr) 3x. Finish all 3 tr stitches together* Repeat 1 times then: Ch3, skip a stitch and dc. Ch3. Skip 3 sts and dc into the end of the row.
Repeat rows 2-5 1 more time.
Front Shaping
This secton will decrease each front section by 8sts over the next 8 rows.
Ch3 and turn.
Row I: skip 3sts(tr, ch1)3x into the next stitch. Skip 3 sts, dc. *ChI (tr, chI)3x into the next stitch.
Skip 3 sts, dc.” repeat 1 more times. Ch3 and turn.
Row 2:*ch 3 (skip a st and start a tr) 3x. Finish all 3 tr stitches together. Ch3, skip a st and dc.” repeat 1 more times. Ch 3 (skip a st and start a tr)3x. Finish all 3 tr stitches together. ChI, dc into the end of the row. Ch3 and turn.
Row 3: *skip 3 sts and dc(work into the top of your 3 tr that are worked together from row 2). ChI, skip 3 sts and (tr, ch1)3x into the next stitch. * repeat 1 more time, then skip 3 sts and dc.
Chs, Skip 3 sts and dc in the end of the row. Chs and tum.
Row 4:*ch3, skip 3 sts and dc. Ch 3 (skip a st and start a tr)3x. Finish all 3 tr stitches together* repeat 1 more time. and then Ch3, Skip a few sts and dc into the end of the row.
Ch3 and turn.
Row 5: Ch2, Skip 3sts and dc into the top of your gathered tr stitches from row 4. *ch1, skip 3 sts and (tr, chI)3x into the next stitch. Skip 3 sts, dc. * repeat 1(1,2,2) more times. Ch3 and turn
Row 6: *ch 3 (skip a st and start a tr)3x. Finish all 3 tr stitches together. Ch3, skip a st and dc.*repeat 1 more time, and then Ch1, Skip a few sts and dc into the end of the row. Ch3 and turn.
Row 7: (tr, ch1)2x, then tr, all into the first dc from row 6. Skip 3 sts and dc(work into the top of your 3 tr that are worked together from row 3). Ch1, skip 3 sts and (tr, ch1) 3x into the next stitch.
Repeat 0 more times. Skip 3 sts and dc. Ch3, Skip 3 sts and dc in the end of the row. Ch3 and turn.
Row 8: *ch3, skip 3 sts and dc. Ch 3 (skip a st and start a tr)3x. Finish all 3 tr stitches together.
Repeat 1 more time, closing off your last group of tr stitches with a chain.
Sleeves (Make 2)
The diamond pattern repeat of four rows is done 2x for short sleeves, and 3-4x for long sleeves (depending on the size).
Ch 41 sts
Row I: skip a st and sc in every other stitch. This will give you a total of 40 stitches.
Ch3 and turn
Row 2: “ch1, skip 3 sts and (tr, ch)3x into the next stitch. Skip 3 sts, dc. “Repeat this 4
more times across the row. Ch3 and turn.
Row 3: *ch 3 (skip a st and start a tr)3x. Finish all 3 tr stitches together. Ch3, skip a st and dc.”Repeat this 4 more times across the row. Ch3 and turn
Row 4: ch3, *skip 3 sts and dc(work into the top of your 3 tr that are worked together from row 3).
Ch1, skip 3 sts and (tr, chI)3x into the next stitch. * Repeat 3 more times, then: skip 3 st and dc. Ch3, Skip 3 sts and dc in the end of the row. Ch3 and turn.
Row 5:*ch3, skip 3 sts and dc. Ch 3 (skip a st and start a tr)3x. Finish all 3 tr stitches together* Repeat 3 more times, then: Ch3, skip a stitch and dc. Ch3, Skip 3 sts and dc into the end of the row. Ch3 and turn.
For Short Sleeves: Repeat rows 2-5 one more time. Then, chI and do a row of sc before binding
For Long Sleeves: Repeat rows 2-5 2 more times. ChI and do a row of 20-24 evenly spaced sc. This will shape the sleeve in and set you up for your cuff ribbing. Ribbed cuffs can be added to add shaping(see cuffs section below). The cuffs can be added right away after the other
rows, or added last after the sleeves are seamed up.
Cuffs (for Long sleeves)
For the end of each sleeve:
Ch1
Rows 1-3: *FPde, BPde** repeat across the row. Your front and back posts should line up to create ribbing-if they don’t, adjust your stitches so that they do. Ch1 and turn between rows.
Final Thoughts
I hope you enjoyed making this beautiful velvet diamond kimono! Once you put it on, it feels incredibly soft and you’ll just want to snuggle it.
Keep the crochet Delightful!
Amelia
What’s Next?
- Share on Facebook or Instagram: I always love seeing fellow crocheters make my patterns! Tag me when you’ve completed it @ameliamakesblog
- Pin the post: Save this post on your Pinterest board, and get back to it later.
Join my Facebook Group
Share your ideas and pictures on my Facebook Group! This is a small private group of crochet enthusiasts that would love to hear from you!


Pingback: The 2020 Crochet (Christmas) Spree ~ Amelia Makes