A simple looking crochet sweater for men that is easy to make and uses the double crochet stitch and ribbed edges.
Let’s talk about crocheting for men! I know that’s not something that we hear often, but I believe the men in our life deserve meaningful crochet gifts that I know they’ll love.
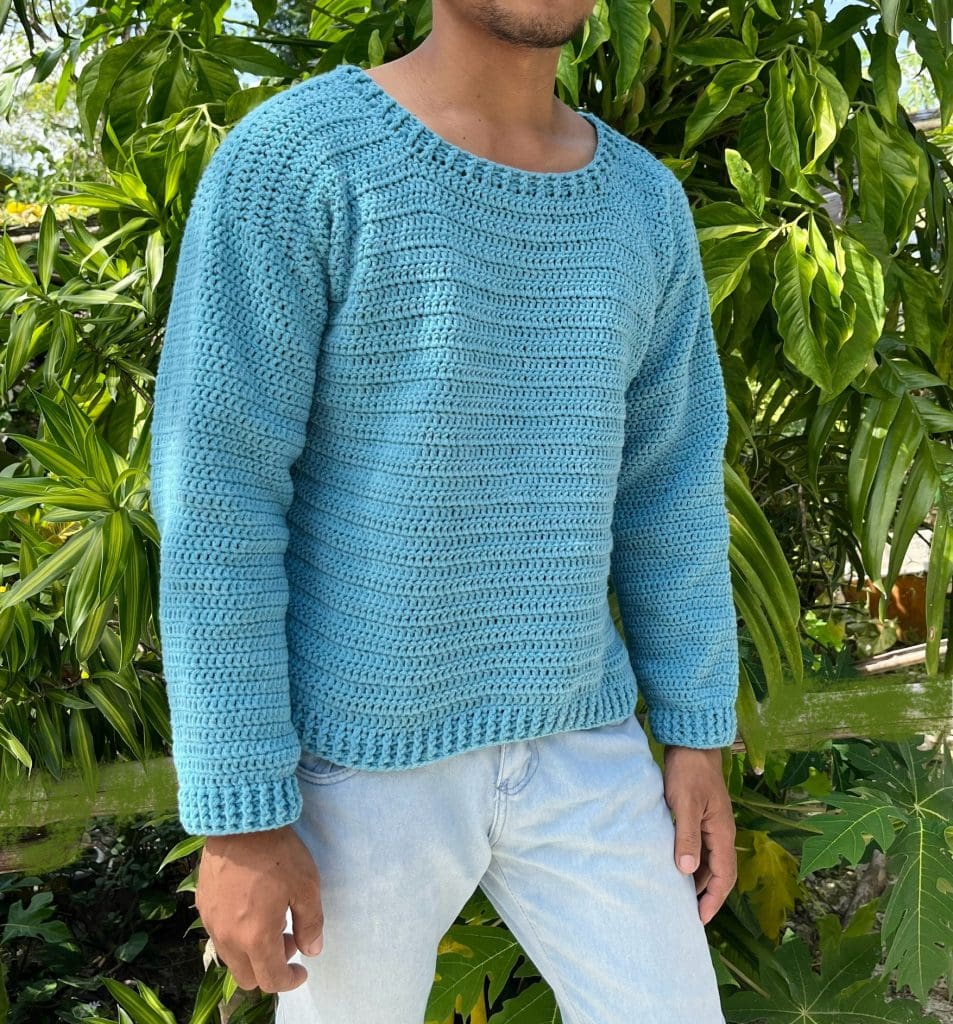
I love this sweater pattern for a father or son because it can be worn with any outfit and still has a classic look to it. I chose the stone blue color for this sweater because I personally love that color on a man. It’s a color that is versatile and suits any season of the year.


About This Project
When it comes to crocheting mens’ garments, you will need to dedicate a few days to make it. It doesn’t matter if you’re a beginner or an experiencing crocheter, it’s important to take your time while making this so you can get the sizing just right!
I love the texture of this sweater because it uses the double crochet stitch, which is a basic stitch that beginners should be very familiar with as well! So this pattern is more on the easy side for crocheting garments.
I also have another similar patter which is the Gingerbread Sweater for women that also uses double crochet stitches. We did a full tutorial video of this sweater that you can view and follow here.
The only challenging part of this pattern is crocheting the ribbed edges. You’ll need to learn how to crochet ribbing, and there are two ways that you can do it. Check out the video tutorial we did on it here.
Note: The free pattern below will only be shown for a size small in men, if you’d like the pattern for all sizes, S to 2XL, then you can purchase the PDF pattern below!
Prefer the PDF Version in ALL Sizes?
Grab the ad-free, printable PDF pattern.
Includes sizes S to 2XL.
You can view it on your computer, phone or tablet or download and print it at home.
Skill Level
When it comes to crocheting garments, you’ll need to learn how to crochet in rounds and learn how to make increases and decreases. In addition, it’s important to take your time with these type of projects and check the size regularly, as fitting is key for garments.
As this pattern also includes ribbing edges, I would label this project for advanced-beginners to intermediate level crocheters.
Notes
Numbers in parentheses at the end of some rows indicate the total number of stitches in that row.
Here are the Bust measurements of the Finished garment size in small, not the actual bust measurements.
Size: Small
Bust: 38″
Materials Needed
- Sports Weight Yarn: Stone Blue
- Crochet hook (4mm)
- Needle for sewing
- Scissors/yarn cutter
- Stitch Marker
Abbreviation Used
- R = row
- RND/S = round/s
- CH = chain
- DC = double crochet
- INC = increase
- DEC= decrease
- FPDC = front post double crochet
- BPDC = back post double crochet
- SL ST= slip stitch
- ST/S = stitch/es
Pattern Direction For Men’s Crochet Sweater in Size Small
Front and Back Part – Make 2
Instructions written in size small.
R1: chain (78) then work 1DC across the chain starting in the 3nd ST from the hook, turn. (76 sts)
R2-R(36): CH2, work 1DC across the stitches, turn (35 rows). (76 sts)
Now let’s create the shoulder part.
R(37): CH2, work (24)DC, turn. (24 STS)
R(38): skip 1ST, work (23)DC, turn. (23 STS)
R(39, 39, 41, 41, 43): CH2, work (23, 25, 27, 29, 31)DC, turn. (23, 25, 27, 29, 31 STS)
R(40): skip 1 ST, work (22)DC, turn. (22 STS)
R(41, 41, 43, 43, 45): CH2, work (22, 24, 26, 28, 30)DC, turn. (22, 24, 26, 28, 30 STS)
R(42): skip 1 ST, work (21)DC, turn. (21 STS)
R(43): CH2, work (21)DC, turn. (21 STS)
R(44): skip 1 ST, work (20)DC, turn. (20 STS)
Cut the yarn and secure the ends.

Tie yarn at the corner on the other side to create the other shoulder part.
Repeat steps from R(37) to R(44).
Create another one to have the Front and Back part.
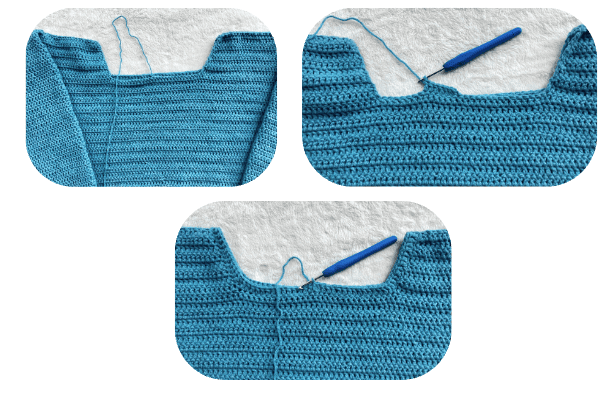
Lay the Front part on top of the back part. Make sure to line up the rows evenly.
Sew the shoulders together using the mattress stitch.
Armhole
Place a stitch marker on your top where you want your seam to stop. It will also determine the size of the armhole.
**For size S and M, seam up to R28 of the Front and Back Part.
Sleeves
Tie yarn on the armhole.
RND1: CH2, work 1DC around the stitches on the armhole, SL ST to the 1st ST of the RND. (Stitch count is not crucial, but make sure that your stitch count here is the same to the other sleeve.)
RND2-RND3: CH2, work 1DC around the stitches, SL ST to the 1st ST of the RND. (2 RNDS)
RND4: CH2, work 2DEC, then 1DC around the remaining stitches, SL ST to the 1st ST of the RND.
RND5-RND10: CH2, work 1DC around the stitches, SL ST to the 1st ST of the RND. (6 RNDS)
RND11: CH2, work 2DEC, then 1DC around the remaining stitches, SL ST to the 1st ST of the RND.
RND12-RND14: CH2, work 1DC around the stitches, SL ST to the 1st ST of the RND. (3 RNDS)
RND15: CH2, work 2DEC, then 1DC around the remaining stitches, SL ST to the 1st ST of the RND.
RND16-RND18: CH2, work 1DC around the stitches, SL ST to the 1st ST of the RND. (3 RNDS)
RND19: CH2, work 2DEC, then 1DC around the remaining stitches, SL ST to the 1st ST of the RND.

RND20-RND23: CH2, work 1DC around the stitches, SL ST to the 1st ST of the RND. (4 RNDS)
RND24: CH2, work 2DEC, then 1DC around the remaining stitches, SL ST to the 1st ST of the RND.
RND25-RND27: CH2, work 1DC around the stitches, SL ST to the 1st ST of the RND. (3 RNDS)
RND28: CH2, work 2DEC, then 1DC around the remaining stitches, SL ST to the 1st ST of the RND.
RND29-RND31: CH2, work 1DC around the stitches, SL ST to the 1st ST of the RND. (3 RNDS)
RND32: CH2, work 2DEC, then 1DC around the remaining stitches, SL ST to the 1st ST of the RND.
RND33-RND34: CH2, work 1DC around the stitches, SL ST to the 1st ST of the RND. (2 RNDS)
RND35: CH2, work 2DEC, then 1DC around the remaining stitches, SL ST to the 1st ST of the RND.
RND36-RND38: CH2, work 1DC around the stitches, SL ST to the 1st ST of the RND. (3 RNDS)
You can add more rounds if you want a longer sleeves.
Now let’s do ribbing on the last RNDS of the sleeves.
RND39: CH2, (FPDC, BPDC) repeat until the last ST.
RND40-RND42: Repeat pattern (FPDC, BPDC) according to the previous ST. (3 RNDS)
Cut the yarn and secure the ends.
Tie yarn on the other armhole and repeat steps from RND1-RND42.
Neckline
Tie yarn in any ST on the neckline.
RND1: Cover the neckline with 1DC in each ST. (Stitch count is not crucial)
RND2-RND3: Ribbing. CH2, (FPDC, BPDC) repeat pattern until the last stitch. (2 RND)
Cut the yarn and secure the ends.
Hem
Tie yarn in any ST on the hem.
RND1: Cover the hem with 1DC in each ST. (Stitch count is not crucial)
RND2-RND4: Ribbing. CH2, (FPDC, BPDC) repeat pattern until the last stitch. (3 RND)
Cut the yarn and secure the ends.
Finishing
Weave in all remaining excess yarns.

Final Thoughts
Thank you so much for spending your precious time with me! This is the first crochet pattern for men that we have at Amelia Makes so it’s definitely an important one to me!
If you enjoyed this pattern, make sure to sign up for the list of updates that we give every week which includes new crochet patterns, tutorials and much more.
Plus, as a bonus for signing up, you’ll immediately get three free patterns straight to your inbox! You can grab it here:
What’s Next?
- Share on Facebook or Instagram: I always love seeing fellow crocheters make my patterns! Tag me when you’ve completed it @ameliamakesblog
- Pin the post: Save this post on your Pinterest board, and get back to it later.
Join my Facebook Group
Share your ideas and pictures on my Facebook Group! This is a small private group of crochet enthusiasts that would love to hear from you!