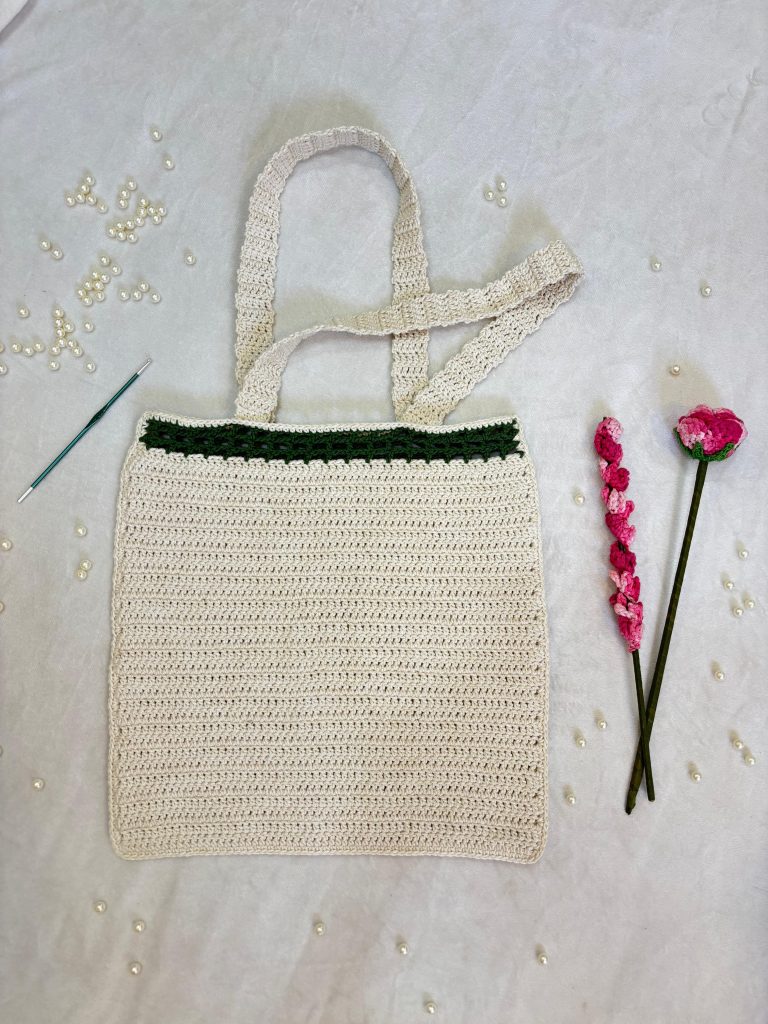
A Double Crochet Stitch tote bag with comfortable handles that come in handy for everyday use, and perfect for beginners!
If you’re like me, and love the practicality of tote bags, then you’ve come to the right place!
Crocheting a tote bag is one of the most fulfilling projects to take on because you know you’ll be using it as an everyday bag to run errands or meet up with friends.
It’s even a great DIY project to crochet as a gift for a loved one. You can never go wrong with giving this handbag as a gift because it will definitely be used!
What I love about this specific tote bag is its simplicity and unique design that may look complicated to crochet but is in fact very simple and great for beginners.
This specific pattern got inspiration from a very popular pattern of ours called the Trevi Hand Towel. It uses the same basic stitch, with an add on of a unique stitch that is made with the double crochet stitch.
We’ve also put together a round-up of 20 stylish crochet tote bags for all levels! I’m sure you’ll find inspiration to crochet more than one of these practical bags.

About The Crochet Tote Bag
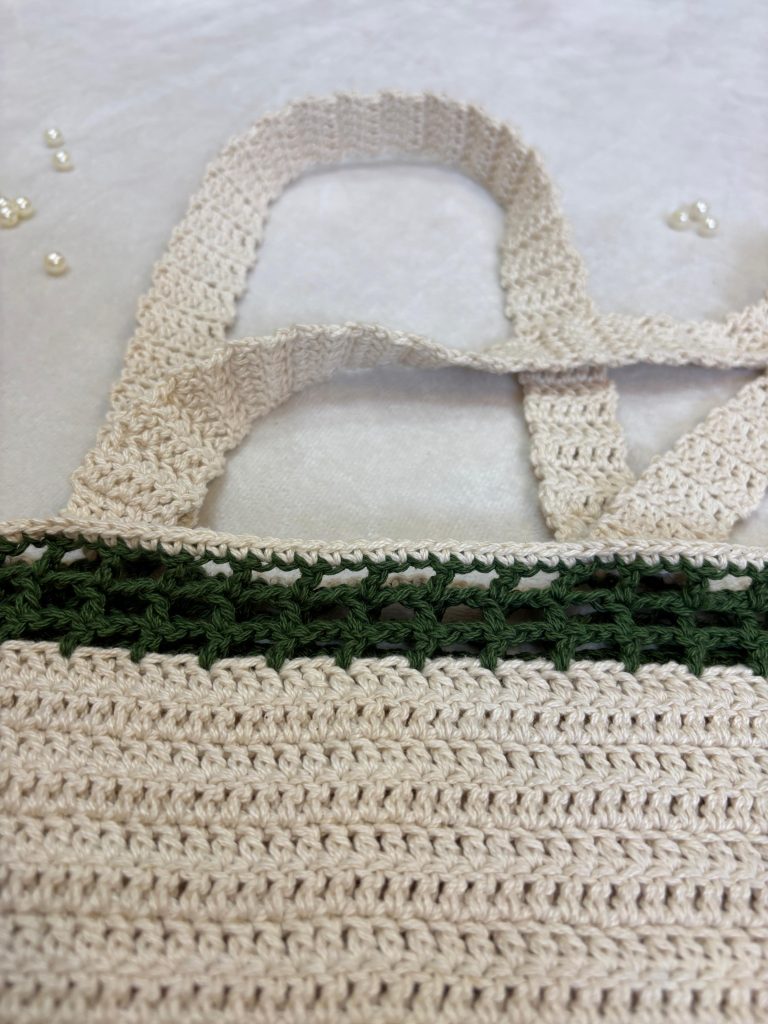
This beginner’s tote bag pattern is simple to crochet because it uses one of the basic stitches, which is the double crochet stitch. You can also see that a few of the top rows have a decorative lacework, which gives the whole bag a stylish look to it.
Now the first few rows may look challenging to do, but I promise it’s actually simple and by following the pattern directions, you’ll be able to complete it very quickly.
It’s also important to know what size tote bag you’re looking to crochet. I normally like to make a medium size bag as it’s the right size for everyday use. This means that it takes around 500 yards of yarn in order to complete the project.
Crocheting the handles onto the bag will take you some time, and is the challenging part of this project. If you’re a beginner, this may take you a few tries to do, as you’ll need to crochet the handles smoothly onto the bag.
Note: Amelia Makes’ Crochet Beginner’s Course includes a detailed video tutorial for crocheting this specific tote bag and much more! If you’re just starting out, I highly recommend exploring everything this course has to offer. Sign up here to get notified when the course is released.

Prefer the PDF pattern?
Grab the ad-free, printable PDF pattern.
You can view it on your computer, phone or tablet or download and print it at home.
Materials Needed For Easy Crochet Tote Bag
- Cotton yarn (off-white & Green)
- 3mm Crochet Hook
- Scissors
- Tapestry needle
- Stitch Markers
Abbreviation Used
- ch – chain
- sc – Single Crochet
- dc – Double Crochet
- inc – Increase
- sl st – Slip Stitch
- st /s – Stitch / es
Crochet Tote Bag Written Directions
Body Of The Bag (Use White Yarn)
Make a sl knot, ch 62
Row 1- Starting from the third ch from the hook
make 1 dc in each chain space (60 dc) ch 2 turn
Row 2-32 –Make 1 dc in each st , ch 2 turn (60 dc)
Fasten off and cut the yarn
Mesh Border (Green Yarn)
Make a sl knot and insert the slip knot into the first st of the row
Row 1 – ch 3 , skip two st/s, make 1 dc into the 3rd st , ch
2, skip 2 st/s , make 1 dc into the 3rd st, repeat this pattern
until the end of the row , ch 3 turn
Row 2-3 –Repeat row 1 (when you reach the end of the row make 1 dc into the 2nd ch space to end the row)
Fasten off and cut the yarn
Repeat the entire pattern from the start one more time (body of the bag and the mesh border).
By now you should have two similar pieces which will be the front and back panels of the bag.
The Handles (Use White Yarn)
Make a sl knot , ch 7
Row 1 – Starting from the 3rd ch from the hook, make 1 dc in every ch space (5 dc) , ch 2 turn
Row 2-55 – Make 1 dc in every st (5 dc) , ch 2 turn
Fasten off and cut the yarn
Attaching The Handles
Count 15 st/s, insert your st marker into the 16th st, now count 5 st/s from the st where you inserted your st marker and insert another st marker into the 5th st
Now count 20 st/s and insert your st marker into the 21st st, then count 5 st/s from the st where you inserted your
stitch marker and add another st marker into the 5th st
You should have 15 st/s remaining Pattern – 15-5-20-5-15
Now make 1 sc all through the row till you reach the st marker, place the handle on the back side and make 1 sc together by passing your hook through all for loops
Repeat the same pattern to attach the the handle to the other part of the body of the bag
Fasten off and cut the yarn
Joining The Sides Of The Bag
Place both the parts of the bag one on top of the other
Make a sl kont , insert your sl kont into the first st/s of both the parts and ch 1 to secure the yarn
Make 1 Inc st in every row space to attach the parts (make sure to pass your hook through both the parts of the bag)
Continue to do this until you reach the corner
Now make 1 sc to attach the base of the bag (make sure you pass your hook through both the parts of the bag)
Continue to do this until you reach the next corner
Now repeat the same pattern for the other side by making an inc st throughout the other side
Fasten off and cut the yarn
Weave all the ends

Final Thoughts
Thank you for spending your precious crochet time with me! I hope this pattern was easy to follow and you’ve completed your tote bag in just a few days!
I made sure to only use one of the basic stitches for this pattern so it’s easy for beginners to quickly get the hang of it. If you’re just starting out, I understand the importance of completing a project that you’re proud of because it will continue to encourage you to crochet more patterns!
What’s Next?
- Share on Facebook or Instagram: I always love seeing fellow crocheters make my patterns! Tag me when you’ve completed it @ameliamakesblog
- Pin the post: Save this post on your Pinterest board, and get back to it later.
Join my Facebook Group
Share your ideas and pictures on my Facebook Group! This is a small private group of crochet enthusiasts that would love to hear from you!